Integrating Grow by Tradedoubler with Google Tag Manager (GTM) involves a few key steps. The general process includes implementing your GTM codes on your website, defining variables, creating tags, and setting up a firing trigger. Here's a step-by-step guide on how to do it:
Step 1: Define Variables in GTM
In this step, you'll be identifying key pieces of information that your website will communicate to Google Tag Manager. These are called 'variables'. Here's how you can do it:
- After logging into Google Tag Manager, look for 'Variables' in the left-hand side panel and click on it.
- Integrating Grow by Tradedoubler with Google Tag Manager (GTM) involves a few key steps. The general process includes implementing your GTM codes on your website, defining variables, creating tags, and setting up a firing trigger. Here's a step-by-step guide on how to do it: Then, under 'User-Defined Variables', click 'New'.
- Now, give your variable a name. This could be related to an order value, order number, or voucher (for example: tdOrderValue, tdOrderNumber, tdVoucher).
- Click on the brick logo to select a variable type. You will often use the 'Data Layer Variable'.
- After this, enter the name of the specific data layer variable on your website that GTM needs to extract data from.
- Once done, click 'Save'.
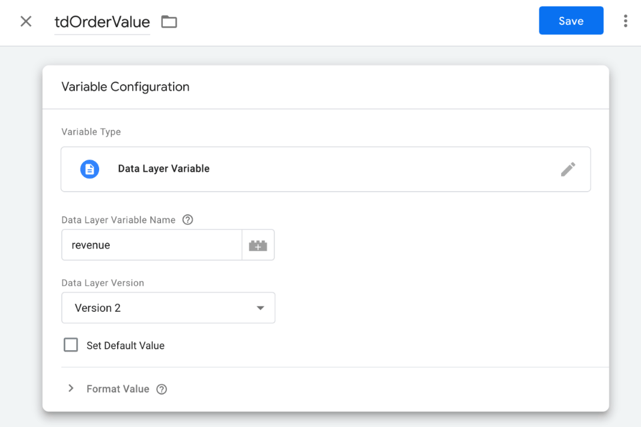
PLEASE NOTE: The revenue is a given example, not necessarily the data layer name on your website.
Step 2: Repeat Variable Creation Process
For all dynamic elements on your website such as order number, voucher, etc., you need to create variables as you did in the previous steps. This will involve logging into Google Tag Manager, creating new 'User-Defined Variables' under the 'Variables' tab, and naming them accordingly (for example, 'tdOrderNumber', 'tdVoucher', etc.).
Step 3: Unique ID
The [ORDER_NUMBER] is a unique ID that you'll generate. This could be an order number, user ID, or anything else unique to each transaction. Once a conversion happens, you can find this ID on our platform, making it easy to cross-reference data.
Step 4: Total Value
[ORDER_VALUE] is the total value of the conversion. We use this value to calculate any percentage-based commissions you might have set up for your program. Be aware you also need to replace the placeholder text in the code by the actual tag or variable that passes this data on your website, dynamically injecting a new value on each transaction.
Step 5: Voucher Code
[VOUCHER_CODE] is the voucher or coupon code that a customer uses during checkout. You need to replace this placeholder text with the actual code, dynamically inserted for each order (if the code is FREEDEL for free delivery then we need to receive FREEDEL instead of this placeholder).
Step 6: Create your Tradedoubler Cookie Tag
- Click 'Tags' on the left panel.
- Click 'New' under 'Tags'.
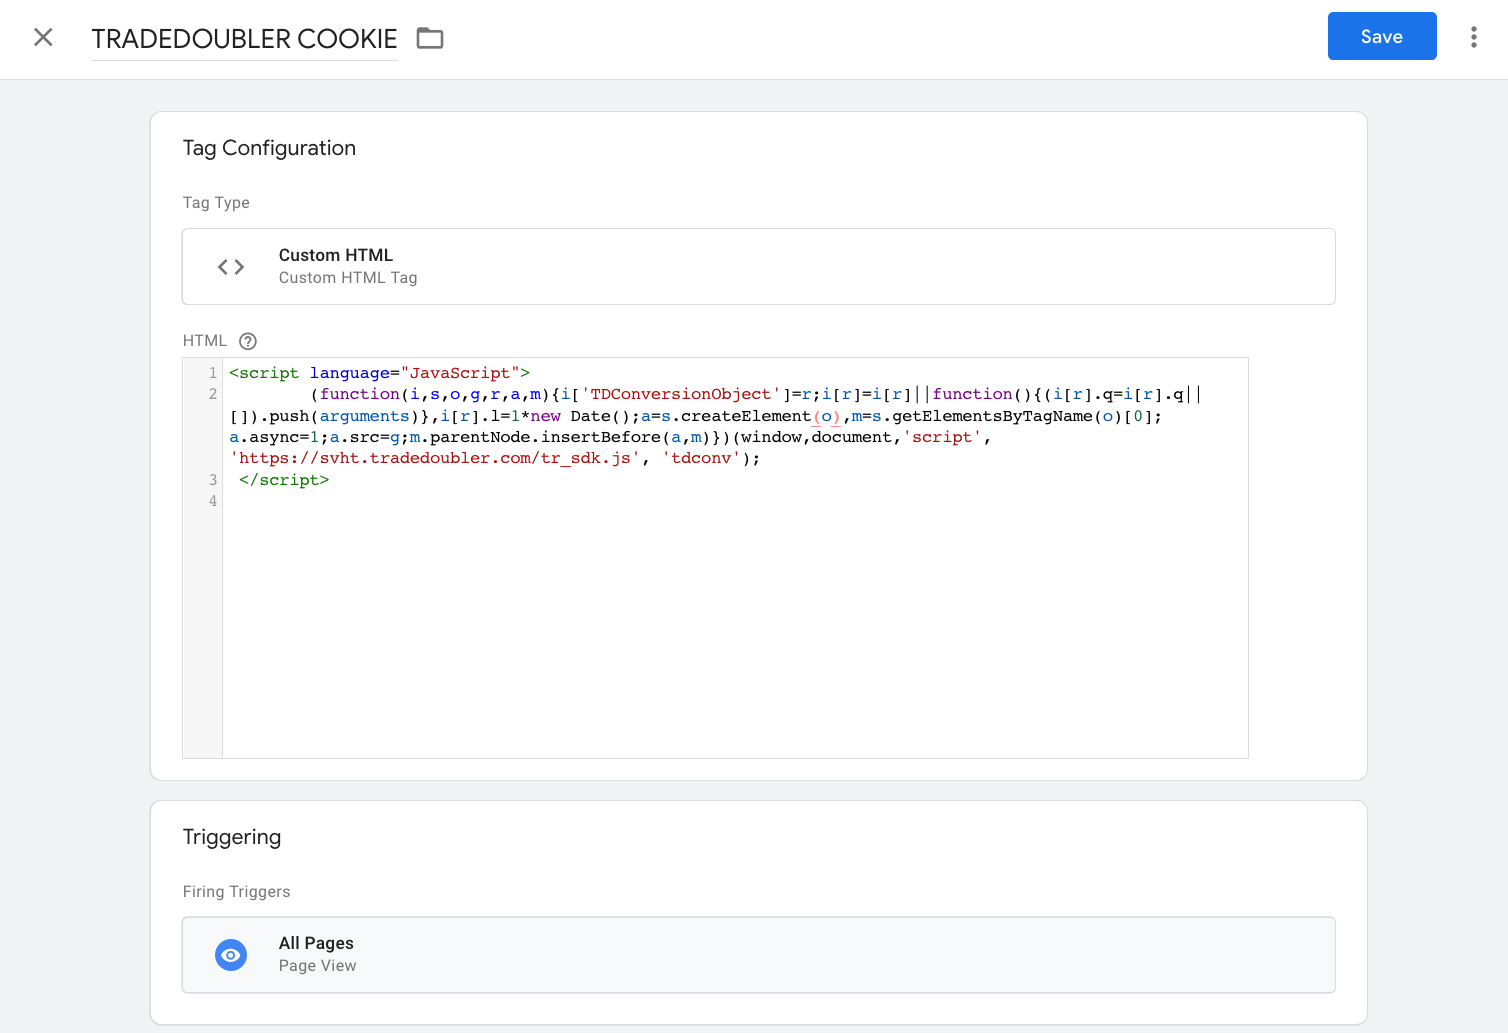
- Name your tag 'TRADEDOUBLER COOKIE'.
- Click the arrow icon to choose a tag type, then choose 'Custom HTML'.
- Copy and paste the following Tradedoubler cookie script into the HTML field:
<!-- Start TradeDoubler Landing Page Tag/1st party cookie script Insert on all landing pages to handle first party cookie-->
<script language="JavaScript"> (function(i,s,o,g,r,a,m){i['TDConversionObject']=r;i[r]=i[r]||function(){(i[r].q=i[r].q||[]).push(arguments)},i[r].l=1*new Date();a=s.createElement(o),m=s.getElementsByTagName(o)[0];a.async=1;a.src=g;m.parentNode.insertBefore(a,m)})(window,document,'script', 'https://svht.tradedoubler.com/tr_sdk.js?org=XXXXXX&prog=YYYYYY&dr=true&rand=' + Math.random(), 'tdconv');
</script>
<!-- End TradeDoubler tag-
Make sure to replace 'XXXXXX' and 'YYYYYY' with your specific organisation and program IDs.
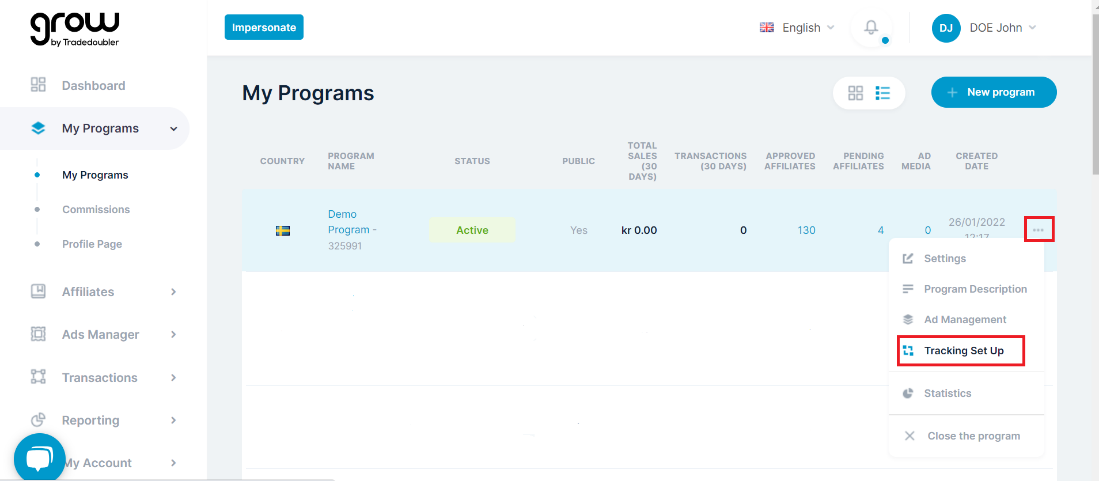
You can verify your organisation and program ID under 'My Programs > Tracking Set-up > Tracking Information at the bottom.
- Set the firing trigger to 'Page View' so the cookie value is grabbed and stored on any page a Tradedoubler affiliate links to.
- Click 'Save' to complete the process.
Note: In these code snippets, you'll see sections that start with <!-- and end with -->. These are comments that are included to help explain what the following section of code does. They're not necessary for the code to work, and can be included or excluded based on your preference.
Step 7: Create a TDUID variable
- Click Variables in the side panel to the left.
- Click New under User-Defined Variables.
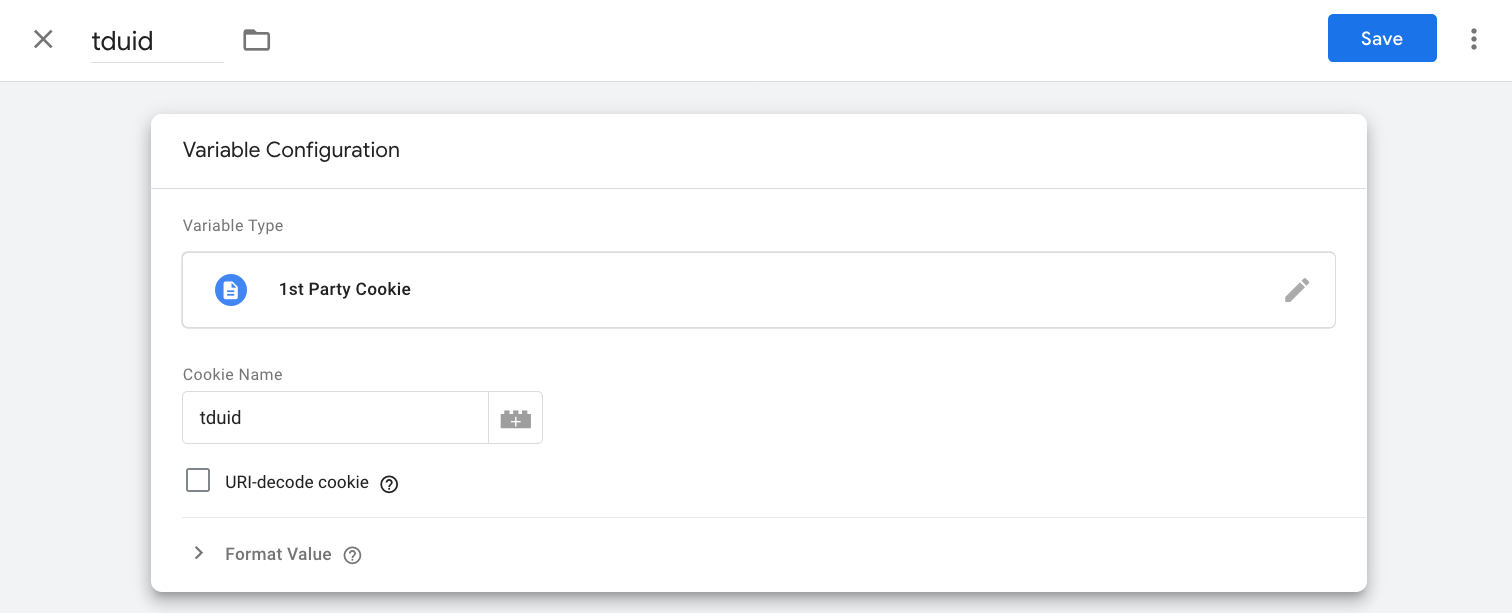
- Name your variable 'tduid'.
- Click the brick logo and choose the variable type '1st Party Cookie'.
- In the Cookie Name field, add in 'tduid', as set in the cookie script.
- Click Save to preserve your changes.
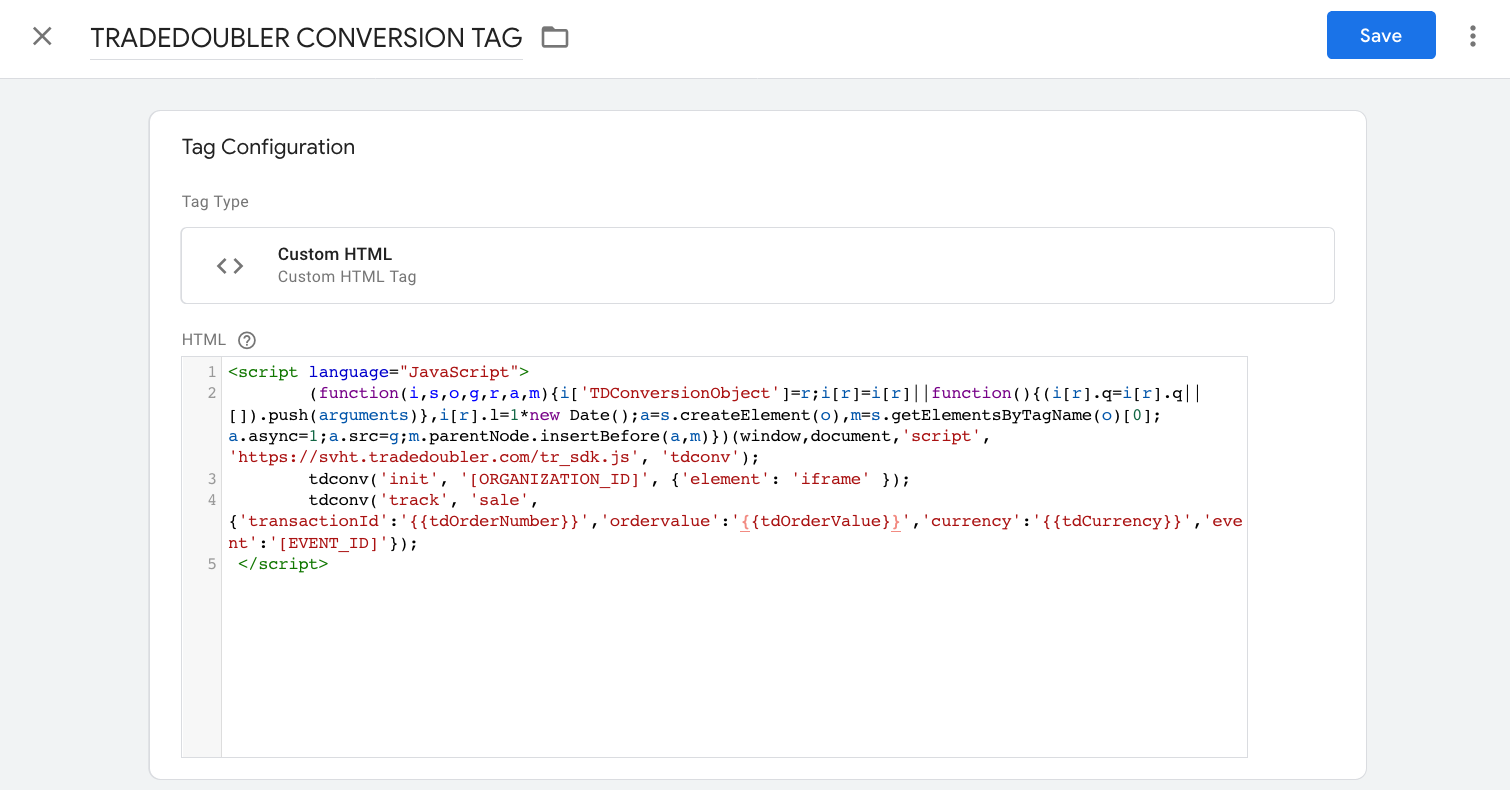
Step 8: Create the Tradedoubler Conversion Tag
- Click on 'Tags' in the sidebar on the left-hand side.
- Click 'New' under the 'Tags' section.
- Give your new tag the name 'TRADEDOUBLER CONVERSION TAG'.
- Click on the little arrow icon, which will open up a list of tag types.
- Select 'Custom HTML' from this list.
- Now, you will be adding the following code to this tag:
<!-- Start TradeDoubler Conversion Tag Insert on confirmation Page -->
<script language="JavaScript">
tdconv('init', 'YYYYYY', {'element': 'iframe' });
tdconv('track', 'sale', {'transactionId':'[ORDER_NUMBER]', 'ordervalue':[ORDER_VALUE], 'voucher':'[VOUCHER_CODE]', 'currency': 'gbp', 'event':YYYYY});
</script>
<!-- End TradeDoubler tag-->
Note: In these code snippets, you'll see sections that start with <!-- and end with -->. These are comments that are included to help explain what the following section of code does. They're not necessary for the code to work and can be included or excluded based on your preference. - Replace 'YYYYYY', '[ORDER_NUMBER]', '[ORDER_VALUE]', and '[VOUCHER_CODE]' with your unique details and the variables you set up earlier.
- Click 'Save'.
IMPORTANT TIP!
If you replace a place holder macro with two curly brackets, you’ll automatically be shown a list of all available variables and can choose the one you’d like to add into the script from there.
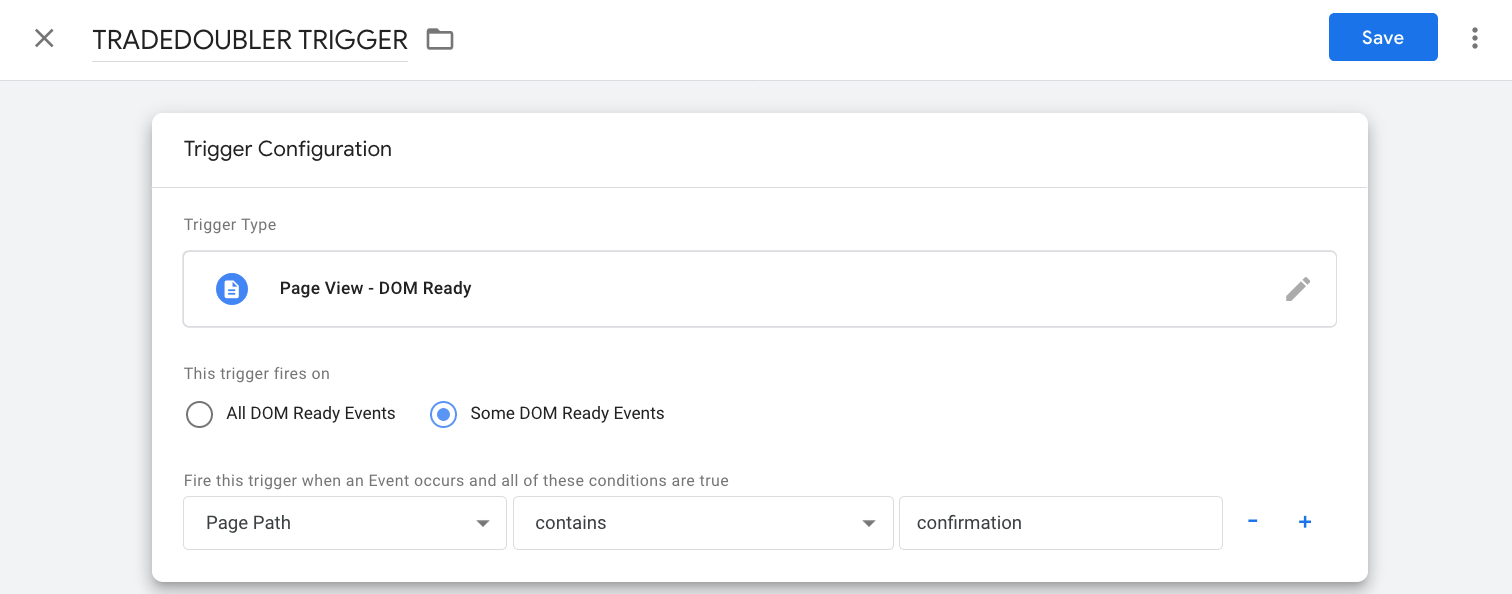
Step 9: Set Up the Firing Trigger
- Under the 'Triggering' section in your conversion tag, click on the small icon that looks like two links of a chain.
- In the upper right-hand corner of the trigger list, you'll see a '+' sign. Click this to create a new trigger.
- Under 'Trigger Configuration', click on the icon that looks like two links of a chain.
- Name your new trigger 'TRADEDOUBLER TRIGGER'.
- From the trigger type list, choose 'Page View – DOM Ready'.
- Set this trigger to fire on 'Some DOM Ready Events'.
- Determine when you want this trigger to fire. For example, if you type 'confirmation' in the field, the trigger will fire when the word 'confirmation' is found in the page path.
- Click 'Save'.
Step 10: Implement GTM Codes on Your Website
- Go to your website's admin panel.
- Locate the section where these codes need to be inserted (usually within the header or footer section of the website or specific pages).
- Paste the copied GTM codes into this section.
Step 11: Publish and test
- With all tags and triggers set, you're now ready to implement them on your website.
- Run a few tests to make sure everything is working as expected.
If your tests aren't successful, or if you run into any problems, don't hesitate to email Grow's support team at growsupport@tradedoubler.com